
No. 1: Establish Neutral Spine
Standing with your back up against a piece of flat wall, place your feet hip width apart and the heels about 6 inches from the wall. Connect your backside, upper back and back of your head to the wall, aiming to get even pressure in all three body parts.
Mobility restrictions or fixed postural issues might stop you feeling even pressure or getting the three body parts on the wall at the same time. If this is the case, try moving your feet farther away from the wall.

No. 2: Stand Tall, Narrow the Waist
The key thought here is to feel the top of your skull moving upward and drawing your spine “up and out” of the pelvis. You are, of course, not literally going to grow 6 inches taller, but this feeling will help to stack your vertebrae correctly and activate key spinal stabilizer muscles.
Narrowing the waist is the cue to help activate your deep core muscles. Imagine you have a very tight piece of string around your abdomen, the same height as your belly button. Now try to loosen the string off by narrowing your waist, but make sure to keep breathing normally. If you are finding breathing difficult, then there is too much bracing going on. Relax a little!
Once you are confident that you’re standing tall and have a narrowed waist, move off the wall and walk around for a while to practice holding the posture without the help from the wall.
No. 3: Activate Your Hip Stabilizers
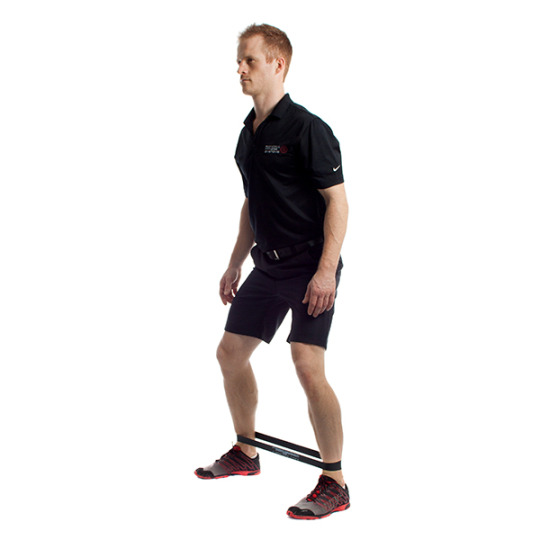
You’ll need a micro-power band or piece of rubber tubing for this. Place the band around your knees, either above or below the knee cap, whichever feels more comfortable. Now take a small squat posture, feet about hip width apart, while maintaining the feeling of standing tall and narrowing your waist.
From here, take small, deliberate steps to the right for 10 meters (30 feet) and repeat to the left for 10 meters. Now try doing the same walking forward for 10 meters and backward (the reverse movement) for 10 meters. The more deliberate and “stomp like” your steps are, the better muscle activation you will get in the glute complex that helps stabilize your hips and pelvis.
The next level is moving the band to the ankle and speeding up the deliberate, stomping steps.
No. 4: Active Your Scapulae (shoulder blades) and Shoulder Stabilizers
For this drill, you would ideally use a GravityFit TPro, but if you don’t have one then a piece of tubing will suffice in the short term.
Using the TPro tubing, assume the correct arm position by taking an inside out grip and turning the palms up. This will take the shoulder into external rotation and help to set the scapulae (shoulder blades) in a position where they are hugged into the rib cage.
Now “pulse” the band by making very small outward circles with your hands. This will help to activate the key muscles surrounding the scapula and back of the shoulder. Again, the faster and more deliberate you make the movement, the better muscle activation you will get.
No. 5: Apply to Your Set Up
So far, we have established a neutral spine and activated the key muscles in the hips, core and shoulders. Now it’s time to apply to this to our golf set up.
With neutral spine established and waist narrowed, simply hinge forward from the hips into a setup position. Your feet should be around hip width apart, turned out slightly with a slight flex in the knee. Your waist will be narrowed and your shoulders set into external rotation with scapulas hugged into the ribcage.
From there simply let the arms hang down and take your grip on the club. This is your brand new athletic set up posture!
Like anything, posture has to be trained before it’s ingrained! I recommend repeating this process several times a day, especially around the time you are practicing. The more often you practice these key steps for set up, the less you will have to think about it on course.
For exercise guides and programs, check out the Golf Fit Pro app for iOS
Special thanks to Ramsay McMaster and Caroline Richardson of Gravity Fit for their contributions in teaching me how to effectively train posture.
If you would like to get a training program that incorporates the exercises above, then check out the following products and services from Nick at Golf Fit Pro:
Leave a comment